Papier Mache

Socializing and general posts on wide-ranging topics. Remember, it's Poststructural!
User avatar
DaveM
Posts: 173
Joined: Tue Jul 04, 2006 2:03 am
Please enter the next number in sequence: 1
Location: Edinburgh, Scotland

Papier Mache

Post by DaveM »

So my son was 4 last weekend. I bought him this Hornby train set with a Thomas the Tank Engine train (with Annie and Clarabel of course). I've put the whole lot on a huge board and bought a few extension packs to make the track more interesting (for me of course :D) but I looked in the window of the hobby shop and the 'accessories' are so expensive I nearly blew my boiler myself.

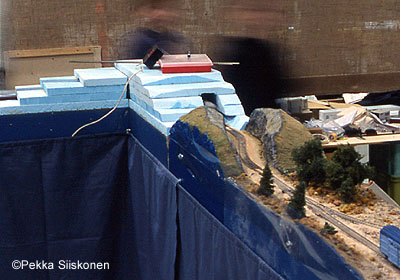
I've convinced the wee man that it will be much more fun to make our own 'accessories' (i.e. hills, tunnels, etc) and then paint them, and I'm sure it will be. He's a dab hand with a paintbrush and loves his craft work. Only thing is I've never used papier mache and he, in that heart-breaking manner that all kids seem to have, thinks his daddy is the man who knows everything about everything, including train set accessories construction......

Anybody done any cool papier mache stuff, and have any tips on what works? I'm talking triple track tunnels etc...

Cheers,

Dave
hyldemoer
Posts: 1829
Joined: Sat Mar 04, 2006 2:08 pm

Post by hyldemoer »

How basic of advice do you need?
Besides the flour, water and strips of newspaper;
basic like, make a general base to form the papier mache on with something like (what we in the USA call) "chicken wire"?

You don't want to make anything too thick to give it strength because it'll dry too hard on the outside before the inside can dry out.

I had an art professor in college (back in the late 60s) who sort of went off the deep end with papier mache after his nephew asked him to make him a halloween costume.
He constructed the poor kid an ostridge costume complete with a 3 foot neck that fit on top of the kid's head (with eye holes partially covered up with feathers at its base).

In the ostridge's head he matched up the color of the ostridge's eyes to the kid's eyes (baby blue) so it looked like the kid's head was trapped inside the ostridge's head on top of that 3 foot neck.

Needless to say, it was much more than the kid was anticipating.

By the end of the semester that professor was buying glass eyeballs by the score and inserting them into all sorts of bizarre objects he'd made out of papier mache.
User avatar
Wanderer
Posts: 4461
Joined: Wed Mar 24, 2004 10:49 pm
antispam: No
Please enter the next number in sequence: 8
Tell us something.: I've like been here forever ;)
But I guess you gotta filter out the spambots.
100 characters? Geeze.
Location: Tyler, TX
Contact:

Post by Wanderer »

User avatar
dubhlinn
Posts: 6746
Joined: Sun May 23, 2004 2:04 pm
antispam: No
Location: North Lincolnshire, UK.

Post by dubhlinn »

hyldemoer wrote:How basic of advice do you need?
Besides the flour, water and strips of newspaper;
basic like, make a general base to form the papier mache on with something like (what we in the USA call) "chicken wire"?

You don't want to make anything too thick to give it strength because it'll dry too hard on the outside before the inside can dry out.
Yep,

Chicken wire is the thing. Fold it over on itself a few times to give it a bit of strength, then a thinnish layer of mache. Leave it for a while to dry out, then break out the paint and away you go.
If you are making tunnels, it helps to make sure that the bottom sides are close enough to being level before you start.

Speaking from cruel and bitter experience, it helps to measure the height of the train + track before you start.

My boy is now eighteen but he takes great delight in telling people about the time that the Train hit the Tunnel...Clara died a slow death and the Fat Controller is still in a state of shock.

Slan,
D. :wink:
And many a poor man that has roved,
Loved and thought himself beloved,
From a glad kindness cannot take his eyes.

W.B.Yeats
User avatar
Jeferson
Posts: 977
Joined: Thu Jun 28, 2001 6:00 pm
antispam: No
Please enter the next number in sequence: 8
Location: Vancouver, Canada

Post by Jeferson »

Dub has nailed it with the chicken wire suggestion. It allows you to do all the forming (and re-forming) very easily, with the final shape all set before you get your hands dirty! Be sure to use a decent pair of gloves when working with the wire, or it'll look like you've been out chicken catching.

Jef
User avatar
BillChin
Posts: 1700
Joined: Tue Aug 05, 2003 11:24 am
Please enter the next number in sequence: 1
Location: Light on the ocean
Contact:

Post by BillChin »

For tunnels and such add a good measure of extra clearance--you'll be very glad you did. I'm talking at least an extra 30% in measurements. The best thing is that the stuff is cheap enough that if you make a mistake you can toss it out and start over.

Poster stock or discarded cardboard boxes can make for fun buildings and such. It you really want to get into it, light bulbs from Christmas lights and some wire can be used to make lighted houses.

It is funny, so many train sets are really bought for the dads.
User avatar
DaveM
Posts: 173
Joined: Tue Jul 04, 2006 2:03 am
Please enter the next number in sequence: 1
Location: Edinburgh, Scotland

Post by DaveM »

Thanks for all the feedback folks - sounds like some chicken wire is the first order of the day.
It is funny, so many train sets are really bought for the dads.
Man, i've been rumbled!

:D

Dave
User avatar
Lambchop
Posts: 5768
Joined: Wed Jul 07, 2004 10:10 pm
antispam: No
Location: Florida

Post by Lambchop »

Don't discount the possibility of using a nice velour fabric instead of paint. You can mold it right over the papier mache. It gives that genuine grass-like effect.
User avatar
emmline
Posts: 11859
Joined: Mon Nov 03, 2003 10:33 am
antispam: No
Location: Annapolis, MD
Contact:

Post by emmline »

BillChin wrote:It is funny, so many train sets are really bought for the dads.
I can name at least one mom who enjoyed playing with the Brio/Brio-clone set at least as much as her children.

(I am also rather fond of Legos)
User avatar
DaveM
Posts: 173
Joined: Tue Jul 04, 2006 2:03 am
Please enter the next number in sequence: 1
Location: Edinburgh, Scotland

Post by DaveM »

Lego rocks!

Dave
User avatar
DaveM
Posts: 173
Joined: Tue Jul 04, 2006 2:03 am
Please enter the next number in sequence: 1
Location: Edinburgh, Scotland

Post by DaveM »

Lambchop wrote:Don't discount the possibility of using a nice velour fabric instead of paint. You can mold it right over the papier mache. It gives that genuine grass-like effect.
Sounds like you have done this before.....

Cheers,

Dave
User avatar
Rod Sprague
Posts: 614
Joined: Sat Apr 13, 2002 6:00 pm
Please enter the next number in sequence: 1
Location: Moscow Idaho

Post by Rod Sprague »

User avatar
gonzo914
Posts: 2776
Joined: Thu May 16, 2002 6:00 pm
Please enter the next number in sequence: 1
Location: Near the squiggly part of Kansas

Post by gonzo914 »

The model railroad guys have started building hills and tunnels out of stacked foam board.

Building a Tunnel (Scroll Down)
STEP 3: BUILDING A TUNNEL

To build a tunnel make a template of the size tunnel you want. I slide a piece of paper such as newspaper under the track and mark it out. Cut out your template and recheck its size. Transfer the pattern to a piece of the leftover foam and cut it out. You will need to make at least 3 identical foam cutouts to stack up for the proper height. Once cut, our three identical pieces are stacked up and glued together. White glue or any type of Styrofoam glue will work. Since we will need Base Paste later in this project, we can save some money by using it in this step as well. If you want to secure the pieces together while the glue dries, push some long nails into the foam.

Take another piece of Styrofoam and cut out a lid or top for your tunnel. Since we will shape these pieces to fit later, you don't have to be to fussy about exact fit now.
Image

Image

Image


Another picture from a different site --

Image
Crazy for the blue white and red
And yellow fringe
Crazy for the blue white red and yellow
User avatar
Innocent Bystander
Posts: 6816
Joined: Wed Aug 03, 2005 12:51 pm
antispam: No
Location: Directly above the centre of the Earth (UK)

Post by Innocent Bystander »

DaveM,
If you are an experienced papier mache maker, go for it.
Otherwise, I say:

Go with strips of pasted paper.
(actual papier mache is a sort of thick porridge of sticky paper mush, which will make anything. But it takes AGES to soak through to the consistency required. Very few people do proper papier mache, which can be used, like clay, to make almost anything. We had a baby-bath made out of the stuff. )

I also advise considering the Plaster of Paris approach.
It is possible (but may be expensive) to get plaster of paris bandages in paper layers. You soak these, lay them on whatever-it-is, and they dry and solidify. A lot less messy than frigging about with papier mache. And slightly more robust. The chicken-wire is still a necessity, though.


My kids loved Brio. And Lego. There is a Legoland at Windsor, not far from where we live. We've been about a dozen times. My son is now sixteen, and a bit old for lego, but he was still mucking about with the lego camera a year ago. My daughter has now stolen it for a webcam for her internet messaging.
Wizard needs whiskey, badly!
hyldemoer
Posts: 1829
Joined: Sat Mar 04, 2006 2:08 pm

Post by hyldemoer »

Styrofoam!
I had a friend in the SCA who made two kingdoms in his house out of styrofoam packing material (that he'd picked out of the garbage); one on the table and the sideboard in the dining room
and the other all over the livingroom (after his wife left him).
Post Reply