Hi, I'm a newbie and couldn't resist replying to your post. I have been infected by the WHOA disorder early and have been trying to make whistles using Guido's instructions. I've made five bad high D whistles before I finally got a whistle that really has a sweet tone and very easy to play in both octaves, so keep making them and don't give up.
I too follow Guido's plans pretty closely. I use half inch CPVC pipes. My first five whistles were playable, but very breadthy and hard to get to the second octave. My conclusion was that Guido has access to pipes with thinner walls then what's available in the hardware stores in the US. When looking at the whistles I bought (Dixons and Freemans), they all have a thinner wind way compared to mine. Also when I point the fipple end at a light and look thru the other end, I can see a slit of light. My conclusion was that the wind way needs to be thinner and the lip should hit at the middle of the wind way splitting the air so half would go over the lip and half would go under (into the tube). I was able to accomplish this by sanding the walls next to the wind way down so the wind way cover sits much lower leaving a thin wind way. I then sanded the top of the fipple block (not bevel) until I see the same slit I see in my other whistles (although I don't sand much so barely see the slit). This change resulted in a very pure sweet tone and med loud whistle. The most amazing thing about these CPVC pipe whistles is that they are very forgiving for a newbie. The low D and E are easy to play and doesn't squeak much. Wish I had one of these when I started.
Lastly, If you are going to make several whistles (and it will take a few), I highly recommend getting a rotary tool (like a Dremel), it makes cutting and sanding so much easier. I got my rotary tool from Costco for only $30.
PVC whistle (er, "non-low" this time)
-
whistlegeek
- Posts: 3
- Joined: Sun Oct 30, 2011 11:04 am
- antispam: No
- Please enter the next number in sequence: 10
-
gregwhistle
- Posts: 131
- Joined: Tue Aug 09, 2011 7:55 am
- antispam: No
- Please enter the next number in sequence: 10
Re: PVC whistle (er, "non-low" this time)
I hate giving up ... it's just not my nature  So I decided to try "tweaking" my own homemade whistle attempts ... not sure why I didn't think of that before.
whistlegeek, as you say, the windway appeared to perhaps be too high to me (the channel too tall). So (this was before seeing your post) I tried carefully applying a strip of that high temperature, very shiny tape (I forget the name, basically, it is like duct tape that is truly for possibly quite hot exhaust ducts) to the top and bottom of the windway - to the top of the fipple block where it is exposed in the windway, and another strip to the underside of the windway cover, thus narrowing the height from both top and bottom. This did strengthen and "sweeten" the tone in the upper octave (at least, before I tried adding more strips of tape and ruining it ), but it still didn't let me reach high A and B.
I'm thinking, after reading your suggestion, of next trying the tape only on the underside of the windway cover - to reduce the height of the windway channel from the top only, in an effort to place the lip more in the center of the air. Your suggestion of sanding the body where the windway cover snaps on seems good as well, provided I can make myself do it evenly enough (my talent in these areas is questionable).
Thank you for the suggestion
whistlegeek, as you say, the windway appeared to perhaps be too high to me (the channel too tall). So (this was before seeing your post) I tried carefully applying a strip of that high temperature, very shiny tape (I forget the name, basically, it is like duct tape that is truly for possibly quite hot exhaust ducts) to the top and bottom of the windway - to the top of the fipple block where it is exposed in the windway, and another strip to the underside of the windway cover, thus narrowing the height from both top and bottom. This did strengthen and "sweeten" the tone in the upper octave (at least, before I tried adding more strips of tape and ruining it
I'm thinking, after reading your suggestion, of next trying the tape only on the underside of the windway cover - to reduce the height of the windway channel from the top only, in an effort to place the lip more in the center of the air. Your suggestion of sanding the body where the windway cover snaps on seems good as well, provided I can make myself do it evenly enough (my talent in these areas is questionable).
Thank you for the suggestion
-
gregwhistle
- Posts: 131
- Joined: Tue Aug 09, 2011 7:55 am
- antispam: No
- Please enter the next number in sequence: 10
Re: PVC whistle (er, "non-low" this time)
I started applying this idea last night (didn't have time to finish). I think it looks quite promising.whistlegeek wrote:My conclusion was that the wind way needs to be thinner and the lip should hit at the middle of the wind way splitting the air so half would go over the lip and half would go under (into the tube). I was able to accomplish this by sanding the walls next to the wind way down so the wind way cover sits much lower leaving a thin wind way. I then sanded the top of the fipple block (not bevel) until I see the same slit I see in my other whistles (although I don't sand much so barely see the slit). This change resulted in a very pure sweet tone and med loud whistle.
I goofed though - I only did a sort of arc on either side of the windway, and the cover did sit lower, but now presents a wide gap with a deeper gap in the middle where the actual window is. I need to reduce the main tube wall thickness (in the window section) all around, or at least farther around so the cover will actually sit down.
-
gregwhistle
- Posts: 131
- Joined: Tue Aug 09, 2011 7:55 am
- antispam: No
- Please enter the next number in sequence: 10
Re: PVC whistle (er, "non-low" this time)
Well, that didn't go well  I was not able to keep the main tube round, so I kept ending up with strange windway cross section shapes like deformed mushrooms (actual windway plus various gaps under the windway cover).
I have definitely gained new appreciation for the skills of people who can actually make whistles :p
I have definitely gained new appreciation for the skills of people who can actually make whistles :p
-
Feadoggie

- Posts: 3940
- Joined: Mon Feb 14, 2005 11:06 pm
- antispam: No
- Location: Stout's Valley, PA, USA
Re: PVC whistle (er, "non-low" this time)
I've been off-line for a few days, no power or communications out here. I'll be clearing trees for the next six months. But maybe I'll get some wood for whistles out of it. It's nice to see that folks can still make whistles elsewhere.
First, when you have a high windway the labium edge should be lined-up more towards the bottom of the windway, not midway (just my experience). You don't want too much air going directly into the tube. It can kill the sound. The blade edge need not be sharp either . You can vary the bluntness and sharpness to see what that does to tone production. You are trying to create a controlled turbulence in the voicing window, not merely splitting the air jet.
So if your pipe wall is thick, you have a high windway height and a breathy voice. A high windway makes it difficult to aim the jet at the blade and sustain the turbulence. To lower the height you can place strips of cellophane tape (or similar materials)the width of the windway to the inside of the mouthpiece collar to build down the windway height. At one time I used to glue strips of plastic under the outer mouthpiece collar to do the trick. A thin layer of putty could do in a pinch too, I suppose, or as a quick experiment.
You can also build up walls around the window to assist in supporting the turbulence at the window. You can do that by making your outer mouthpiece collar longer than normal and cutting a notch in it that is the width of the window so that it extends along the sides of the window and past the edge of the blade. Is that clear? An added benefit is that if you do not glue the part together you can twist the collar so that it covers part of the window to act as a mute when you want to play quieter than usual. You can also build temporary walls around the window with poster putty or clay if you'd like to experiment. Here's a picture of some of my early designs of simple no-tech whistles heads, a couple show the walls extended along side the window.
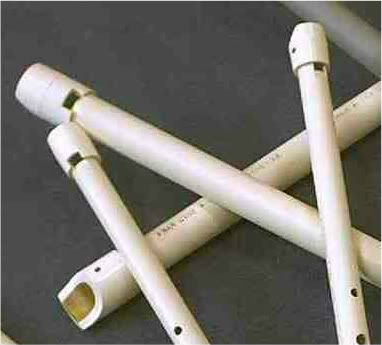
The best way to control windway height is to buy a lathe and vary the windway height by turning the pipe wall down to something more ideal or at least manageable. That's the best way to avoid the arcs you are getting on either side of your windway. Just be warned that lathes seem to multiply once they are held captive in a shop setting. One lathe grew into four lathes over a ten year period in my shop.
Feadoggie
Yes, the GG whistle design is based on a pipe with a narrow wall. And the height of the windway is determined by the wall thickness. If you are using U.S. standard I/2" schedule 80 CTS CPVC pipe, you'll get a breathy whistle. We've discussed this in several other threads but here's the gist of what you can do to get a working whistle. And some of us have discussed the available pipe difference with Guido so he has a few notes on his sight about it.gregwhistle wrote:Well, that didn't go well I was not able to keep the main tube round, so I kept ending up with strange windway cross section shapes like deformed mushrooms (actual windway plus various gaps under the windway cover).
First, when you have a high windway the labium edge should be lined-up more towards the bottom of the windway, not midway (just my experience). You don't want too much air going directly into the tube. It can kill the sound. The blade edge need not be sharp either . You can vary the bluntness and sharpness to see what that does to tone production. You are trying to create a controlled turbulence in the voicing window, not merely splitting the air jet.
So if your pipe wall is thick, you have a high windway height and a breathy voice. A high windway makes it difficult to aim the jet at the blade and sustain the turbulence. To lower the height you can place strips of cellophane tape (or similar materials)the width of the windway to the inside of the mouthpiece collar to build down the windway height. At one time I used to glue strips of plastic under the outer mouthpiece collar to do the trick. A thin layer of putty could do in a pinch too, I suppose, or as a quick experiment.
You can also build up walls around the window to assist in supporting the turbulence at the window. You can do that by making your outer mouthpiece collar longer than normal and cutting a notch in it that is the width of the window so that it extends along the sides of the window and past the edge of the blade. Is that clear? An added benefit is that if you do not glue the part together you can twist the collar so that it covers part of the window to act as a mute when you want to play quieter than usual. You can also build temporary walls around the window with poster putty or clay if you'd like to experiment. Here's a picture of some of my early designs of simple no-tech whistles heads, a couple show the walls extended along side the window.
The best way to control windway height is to buy a lathe and vary the windway height by turning the pipe wall down to something more ideal or at least manageable. That's the best way to avoid the arcs you are getting on either side of your windway. Just be warned that lathes seem to multiply once they are held captive in a shop setting. One lathe grew into four lathes over a ten year period in my shop.
Feadoggie
I've proven who I am so many times, the magnetic strips worn thin.
-
gregwhistle
- Posts: 131
- Joined: Tue Aug 09, 2011 7:55 am
- antispam: No
- Please enter the next number in sequence: 10
Re: PVC whistle (er, "non-low" this time)
Ah, so it's a catch-22 for my (easily available) pipe. The thin-walled pipe has too large of a bore; the pipe with the narrower bore has too thick a wall.
Thank you for your suggestions; I will try them
Thank you for your suggestions; I will try them
-
gregwhistle
- Posts: 131
- Joined: Tue Aug 09, 2011 7:55 am
- antispam: No
- Please enter the next number in sequence: 10
Re: PVC whistle (er, "non-low" this time)
Wow - hope cleanup is going well!Feadoggie wrote:I've been off-line for a few days, no power or communications out here. I'll be clearing trees for the next six months. But maybe I'll get some wood for whistles out of it. It's nice to see that folks can still make whistles elsewhere.
So, reduce the height from the top? But wouldn't that push the airstream down, in relation to the blade?Feadoggie wrote:So if your pipe wall is thick, you have a high windway height and a breathy voice. A high windway makes it difficult to aim the jet at the blade and sustain the turbulence. To lower the height you can place strips of cellophane tape (or similar materials)the width of the windway to the inside of the mouthpiece collar to build down the windway height. At one time I used to glue strips of plastic under the outer mouthpiece collar to do the trick. A thin layer of putty could do in a pinch too, I suppose, or as a quick experiment.
So maybe I should apply strips of tape to the exposed part of the fipple block? To reduce the height from the bottom of the channel?Feadoggie wrote: First, when you have a high windway the labium edge should be lined-up more towards the bottom of the windway, not midway (just my experience). You don't want too much air going directly into the tube. It can kill the sound.
Or am I misunderstanding (my money is on that possibility)?
-
Seonachan

- Posts: 269
- Joined: Fri Jul 31, 2009 3:09 pm
- antispam: No
- Please enter the next number in sequence: 10
- Location: Massachusetts an Iar
Re: PVC whistle (er, "non-low" this time)
Just to add a note re: Guido's dimensions vs. what's commonly available in the US. I was in Germany last year and brought home some of the same pipe he uses. It is noticeably thinner than either CPVC or the thin-walled PVC that most folks here recommend. I haven't had time to make a whistle to completion yet but I do have a low and an alto that are partly finished, and my impression is that it's much easier to get a non-breathy sound and, in general, the material is more forgiving and easier to work with. The only disadvantage I find is that the thin wall makes for a "weak" (loose) cap that is difficult to keep in place without gluing or pinning it.
'Se SUV a th'anns a' chànan eile agam
-
Latticino
- Posts: 445
- Joined: Tue Aug 05, 2008 7:30 pm
- antispam: No
- Please enter the next number in sequence: 8
- Location: Upstate NY
Re: PVC whistle (er, "non-low" this time)
I'm not familiar with European piping sizes, but there are several commonly available thickness standards here in the states (Schedule 40, Schedule 80 and SDR 11 for example). Schedule 80 is much too thick for practical use in making whistles using the GG plans (unless you have a lathe or some other method of boring out the excess material). However, SDR 11 might be an attractive option. For typical nominal pipe sizes the thickness works out as follows (SDR 11 first number minimum thickness, Sch 40 second number): 1/2": 0.068"/0.109", 3/4": 0.08"/0.113", 1": 0.102"/0.133", 1 1/4": 0.125"/0.140", 1 1/2": 0.148"/0.145". As can be seen, for sizes under 1 1/2" pipe it might be worth looking at SDR 11 piping (check your local plumbing supply). Other options include the more rare SDR 21 and SDR 26. These are even thinner sections, but you might end up having to special order them (hint, ask for some samples...). For typical nominal pipe sizes the thickness works out as follows (SDR 21 first number minimum thickness, SDR 26 second number): 3/4": 0.06"/NA, 1": 0.063"/0.06", 1 1/4": 0.079"/0.064", 1 1/2": 0.09"/0.073".
I don't think you need to import from Europe to get thinner wall CPVC or PVC for that matter.
I don't think you need to import from Europe to get thinner wall CPVC or PVC for that matter.
"Experience is something you don't get until just after you need it"
Steven Wright
"Your reality, sir, is lies and balderdash and I'm delighted to say that I have no grasp of it whatsoever."
Baron Munchausen
Steven Wright
"Your reality, sir, is lies and balderdash and I'm delighted to say that I have no grasp of it whatsoever."
Baron Munchausen
-
whistlegeek
- Posts: 3
- Joined: Sun Oct 30, 2011 11:04 am
- antispam: No
- Please enter the next number in sequence: 10
Re: PVC whistle (er, "non-low" this time)
Well, maybe midway is exaggerated on my part, but if you point the fipple end to the light and look thru the other end, you want to see just a slit of light. Fipple block is easy to make. Try a few different ways and see what works for you. I used to think that I need to find a pipe with thinner walls but the CPVC pipes sounds just fine. It's all about the fipple. I believe the Parks whistle is made of 1/2 inche CPVC pipe too.gregwhistle wrote: So maybe I should apply strips of tape to the exposed part of the fipple block? To reduce the height from the bottom of the channel?
Or am I misunderstanding (my money is on that possibility)?
-
gregwhistle
- Posts: 131
- Joined: Tue Aug 09, 2011 7:55 am
- antispam: No
- Please enter the next number in sequence: 10
Re: PVC whistle (er, "non-low" this time)
So I finally picked up some of the "right" stuff - thin wall, small diameter CPVC. Says "SDR11" on it. Looks to be the right stuff ...
Have everything made except the holes. Wish me luck
Have everything made except the holes. Wish me luck
-
highwood
- Posts: 562
- Joined: Thu Feb 07, 2008 3:30 pm
- antispam: No
- Please enter the next number in sequence: 12
- Location: Ohio
Re: PVC whistle (er, "non-low" this time)
Good Luck!
how small is small diameter?
in SDR11 the '11' refers to the ratio of diameter to wall thickness... to quote Peterson:
I like many others use 1/2" CTS for high D whistles - CTS stands for Copper Tube Size and the 1/2" is close to the id of this tube (which varies) OD = 0.625" wall = 0.068 ±0.020 id (as measured by me) 0.475 - 0.495. This wall is IMHO too thick for a wind way height .
1/2" sch 40 has an id of about 0.622", wall about 0.109"
1/2" sch 80 has an id of about 0.546", wall about 0.147"
Both have an OD of 0.840 - just like the 1/2" SDR11
Seems to me I've tried turning down 1/2 sch40 and using SDR11 to slip over the top but from the above numbers I would think that would make a too small wind way height - I do not remember the results, and it is entirely likely that my samples of tube had differing measurements. The outside measurements are accurate (they need to fit the fittings) the inside vary and can make consistent whistle making more of a challenge
how small is small diameter?
in SDR11 the '11' refers to the ratio of diameter to wall thickness... to quote Peterson:
They go on to list a 1/2 inch SDR11 pipe with an OD of 0.840" ID of 0.696" and min wall of 0.076" (what has 1/2" got to do with any of those measurements you might ask) , they also list a SDR13.5 same OD with a min wall of 0.062".SDR = "Standard Dimension Ratio" is used by many PE pipe manufacturers as a method of rating pressure piping. SDR is a ratio of pipe diameter to wall thickness and can be expressed as SDR = D/s
SDR 11 means that "D" outside diameter of the pipe is eleven times the thickness "s" of the wall.
With a high SDR ratio the pipe wall is thin compared to the pipe diameter and will have a low pressure rating.
With a low SDR ratio the pipe wall is thick compared to the pipe diameter and will have a high pressure rating.
I like many others use 1/2" CTS for high D whistles - CTS stands for Copper Tube Size and the 1/2" is close to the id of this tube (which varies) OD = 0.625" wall = 0.068 ±0.020 id (as measured by me) 0.475 - 0.495. This wall is IMHO too thick for a wind way height .
1/2" sch 40 has an id of about 0.622", wall about 0.109"
1/2" sch 80 has an id of about 0.546", wall about 0.147"
Both have an OD of 0.840 - just like the 1/2" SDR11
Seems to me I've tried turning down 1/2 sch40 and using SDR11 to slip over the top but from the above numbers I would think that would make a too small wind way height - I do not remember the results, and it is entirely likely that my samples of tube had differing measurements. The outside measurements are accurate (they need to fit the fittings) the inside vary and can make consistent whistle making more of a challenge
“When a Cat adopts you there is nothing to be done about it except put up with it until the wind changes.” T.S. Elliot
-
highwood
- Posts: 562
- Joined: Thu Feb 07, 2008 3:30 pm
- antispam: No
- Please enter the next number in sequence: 12
- Location: Ohio
Re: PVC whistle (er, "non-low" this time)
If you have 1/2"SDR11 with an OD of 0.840" can I humbly suggest trying to make a low F or maybe a low E or G
I hasten to add that I have not made any whistle from SDR11 - I have made a low F# with 3/4" CTS - id of about 0.695 same as SDR11 (why F# you ask - I think I made an error on my spreadsheet, twas supposed to be an F but oops... oh well and of course if you want a solo you could probably finish it before most would discover what key you were playing in! - it is 6#s!)
I hasten to add that I have not made any whistle from SDR11 - I have made a low F# with 3/4" CTS - id of about 0.695 same as SDR11 (why F# you ask - I think I made an error on my spreadsheet, twas supposed to be an F but oops... oh well and of course if you want a solo you could probably finish it before most would discover what key you were playing in! - it is 6#s!)
“When a Cat adopts you there is nothing to be done about it except put up with it until the wind changes.” T.S. Elliot
-
gregwhistle
- Posts: 131
- Joined: Tue Aug 09, 2011 7:55 am
- antispam: No
- Please enter the next number in sequence: 10
Re: PVC whistle (er, "non-low" this time)
I measure the id at somewhere between 11 and 12 mm.
It looks closer to "normal" high D dimensions than anything else I've found so far.
It looks closer to "normal" high D dimensions than anything else I've found so far.
-
whistlegeek
- Posts: 3
- Joined: Sun Oct 30, 2011 11:04 am
- antispam: No
- Please enter the next number in sequence: 10
Re: PVC whistle (er, "non-low" this time)
Yep, that's what I use for my high D whistles, 1/2 inch SDR-11 CPVC pipe. Good luck!