
På svenska - Polymerlera (bla Cernit, Fimo, Sculpey, Premo ...)
Finns i de flesta hobbybutiker.
Lycka till!
/MarcusR
Wish me luck

Hhhm. I'm not quite sure wether this would be a good idea. PVC modelling clays such as FIMO contain a great number of plasticizers. Allthough the highly unhealthy phtalate has been forbidden in Europe (Standard EN 71 part 5), I'm not sure about other countries... Plus, I've no idea wether the plasticizers now being used are dangerous, too.Feadoggie wrote:If it helps, two popular poly-clay brands go by the names Fimo and Sculpey. These are widely used in arts and crafts for all kinds of things from jewelry making to small sculptures. Once hardened this stuff is basically solid PVC. It is easily shaped and polished and it comes in lots of outrageous colors.
For more information see:
hidden health hazards of polymer clays
-
jemtheflute
- Posts: 6969
- Joined: Tue May 23, 2006 6:47 am
- antispam: No
- Please enter the next number in sequence: 8
- Location: N.E. Wales, G.B.
- Contact:
Thanks, Guido!Guidus wrote:B*E*A*U*T*I*F*U*L!!!
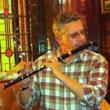
Here are some more pictures of (mostly) my more recent efforts.
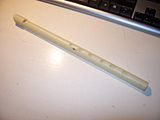
The School Piccolos are very simple - plain drilled embouchure hole, no filing out to ellipse or undercutting, but they do have a lip-plate and a tuning correction wedge inside the head, the edges of which can be seen in these pics, one rolled "in" and the other "out".


Next is a shot of one of the newly made School Piccolos together with a high D whistle I made earlier this year with a Milliput fipple plug, and also an offcut of unworked tube.

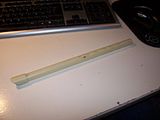
Then there are some pics to try to show the difference between the tube as bought and the finish I get on it with wire wool........ should be obvious which is which!


This one's using daylight to try to get away from flash glare:

Here are some detailed ones of the Soprano Head and complete Whistle. It generates a very nice tone in the lower octave, but the window is a bit too deep and it needs too much wind and is harsh and sharp above G in the 2nd 8ve and won't really go to top D, so it's not a complete success, but it was my first (and so far only) effort at a small one.
These show the Milliput fipple block clearly.


Next are some shots of the part-made Alto Whistle head I'm intermittently working on (my most recent effort) for F or G bodies in 20mm OD tube:


Loosely assembled..... not glued up, beak not cut....


Now here are some shots of the Low whistle head I made in 25mmOD tube back when I was reviewing Guido's Low whistle and had a rush of enthusiasm for doing this stuff and experimenting..... I made some extra bits to fit on Guido's whistle, then had a go at a head of my own - this was the first one I ever made and using Milliput for the fipple - this is the ordinary yellowish grade of Milliput, not the black I used for the more recent Soprano head. I didn't make any new body tubes for it - just used it with the ones left over from my attempts at flutes in this tube about 10 years ago. I think the beak is too short for best comfort and the window is a bit narrow from side to side and maybe a bit deep longitudinally, though it works/plays pretty decently, if not quite as well as the Dave Lymm one I bought originally that got me started with the conduit tube back then.....


And lastly, the Low and High ones together showing the beak profiles:


Well, that was a bit self indulgent of me - I hope it is of some help/interest, but I must emphasise I am still an experimenter where the whistles are concerned - have only made two, neither of which I'd call successful. With the flutes/piccolos I feel rather more confident!
I respect people's privilege to hold their beliefs, whatever those may be (within reason), but respect the beliefs themselves? You gotta be kidding!
My YouTube channel
My FB photo albums
Low Bb flute: 2 reels (audio)
Flute & Music Resources - helpsheet downloads
My YouTube channel
My FB photo albums
Low Bb flute: 2 reels (audio)
Flute & Music Resources - helpsheet downloads
-
West

- Posts: 165
- Joined: Tue Aug 12, 2008 1:35 pm
- Please enter the next number in sequence: 1
- Location: Sweden
Tackar!MarcusR wrote:På svenska - Polymerlera (bla Cernit, Fimo, Sculpey, Premo ...)
Finns i de flesta hobbybutiker.
Lycka till!
Jem, don't worry about it. These images are very inspiring -- not to mention educational. I only wish those black pvc pipes were available here as they looks a whole lot cooler than the sickly off-white ones. OTOH, my first whistle(s) will probably not be a success, so once I get better at this, I can get myself some better looking pipes.jemtheflute wrote:Well, that was a bit self indulgent of me
One question though: what do you use to cut the beaks in such a nice curved shape?
Trying is the first step towards failure -- Homer Simpson
-
West
- Posts: 165
- Joined: Tue Aug 12, 2008 1:35 pm
- Please enter the next number in sequence: 1
- Location: Sweden
I was pondering how to go about making a one-piece whistle, i.e. no clip-on cap. Now, I have no experience with whistle making and the mechanics of wind instruments, so be gentle with me if I'm way off target here.
Here's a quick & ugly image, it's obviously not to scale or anything, but it should help illustrate my thinking.

Would this even work?
Here's a quick & ugly image, it's obviously not to scale or anything, but it should help illustrate my thinking.
Would this even work?
Trying is the first step towards failure -- Homer Simpson
-
ahogrelius
- Posts: 220
- Joined: Sat Jan 12, 2008 4:08 pm
- antispam: No
- Please enter the next number in sequence: 8
- Tell us something.: I'm just trying to update my profile. I need to change my location since I no longer is living in Sweden. I'm still playing the whistle though for the most time I'm just a lurker on the Chiff and Fipple board.
- Location: Sunny Southern California
The windway should be narrowing towards the window instead of the other way around. You want to increase the airspeed as it moves through it... Usually it works well enough just making the windway without any changes in dimensions from the beak to the window.
You will need to push down the blade somehow to get it in the airstream from the windway though this can be hard to do on a whistle made of polymer pipes.
Cheers,
Anders
You will need to push down the blade somehow to get it in the airstream from the windway though this can be hard to do on a whistle made of polymer pipes.
Cheers,
Anders
If tin whistles are made of tin, what are foghorns made of?
You may want to check out some of the castable products at www.alumilite.com I don't know what their availability would be outside the US.
-
jemtheflute
- Posts: 6969
- Joined: Tue May 23, 2006 6:47 am
- antispam: No
- Please enter the next number in sequence: 8
- Location: N.E. Wales, G.B.
- Contact:
The most obvious difficulty with your draft, West, apart from the direction of taper as already noted, is that you are using a flat-floored windway aiming at a curved labium blade. That is why Guido and others adopt the round floored windway/unflattened plug with clip-on cap. In molded whistle heads or plastic recorders and in turned wooden whistles and recorders, the maker can design the labium/cut the relevant part of the bore as they wish to coincide with the floor of the windway, so flat ones are feasible - you need to examine some to see what I mean. When you look through a windway with your line of sight along the floor, the edge of the labium blade needs to be just a hair's breadth above that line, in parallel with it both vertically and laterally. Otherwise, whilst you may generate a tone, at best there will be significant air wastage and undue turbulence making the tone generation less efficient and giving a lot of extraneous and undesirable hiss, and quite likely greater difficulty in control between 8ves etc. or it may not be willing to sound properly at all. The full bore round plug, tube side cut-out and windway-cap are the simplest way of achieving the proper windway-window-labium conformation in pre-extruded cylindrical tube, actually taking advantage of its form. If you use a flattened fipple as you suggest, you will need also to put some kind of counter-ramp of filler under the down-tube side of your rough-cut window in order to be able to cut/file a straight-edged labium to match - and such a lump in the tube may have tuning and response implications........ altogether more complex. It might be possible to heat up and mold the tube wall flat in the labium-to-be area, but that would be tricky to do consistently. (That is in effect what Tony Dixon appears to do on the whistles he makes from conduit tube, but I guess he has developed machine tools for the task!)
To answer your earlier Q about the curved beak, this is what I do:
Cut off the excess part of the original windway-fipple construction at the desired angle with a hacksaw, being careful not to go too close to but to be parallel to a line joining the lower corners of the windway floor at the top, nor too close to the down-tube face of the plug at the bottom. I tend (so far, all twice!) to go for two cuts, in from each side/end separately, which allows you to cut a shallow V if you wish. However, I'm using hand tools - if one has a machine mitre saw then a single cut would be easier - and easy to set up for accuracy. However you cut, you will need to tidy up with a file and abrasives. I use half-round metal files to produce the curve - which of course you can do whether you have a flat or V cut after sawing. I start with a fairly coarse one to get the basic shape, than tidy up with progressively finer ones and finally wet-and-dry paper.
There you go!
I am tending towards making longer windways/plugs in order to be able to cut a more comfortable, more acute beak angle - I don't like less than 45 degrees and that is too little really (unless you like to hold your whistle out at a flattish angle when playing - I don't!); a curve helps get more comfort in a shorter beak, but really more length to allow nearer a 30 degree angle (relative to long axis) is desirable, curved or not.
As for sourcing the black pipe, where did you get your white stuff? Plumbing supplies or DIY store? Try an electrical factor for electrical conduit and ask to see their catalogue. Here in Britain one can find both colours in the DIY chainstores, but less of the black, and less variety of sizes. Go to the pros! When I stocked up for my piccolo making course, I had to special order the 16mm OD tube (30x3m lengths! - will keep me going for a while - but cost me less than £40GBP) as even the electrical factors don't usually stock it - not much demand for so small a size - they usually carry the 20mm OD and 25mm OD in both black and white. Have a look at this: http://www.aurigaeurope.com/partners/mk/Egatube.pdf. I'd be surprised if there isn't an equivalent in most European countries.
I respect people's privilege to hold their beliefs, whatever those may be (within reason), but respect the beliefs themselves? You gotta be kidding!
My YouTube channel
My FB photo albums
Low Bb flute: 2 reels (audio)
Flute & Music Resources - helpsheet downloads
My YouTube channel
My FB photo albums
Low Bb flute: 2 reels (audio)
Flute & Music Resources - helpsheet downloads
-
Carey

- Posts: 578
- Joined: Fri Jan 19, 2007 8:38 pm
- Please enter the next number in sequence: 1
- Location: In the dog house. Gone playing music too much recently.
- Contact:
West,
Good to see you thinking and sharing. perhaps you'll find a way to get what you are looking for. As Jem has said, your wind way shape and position relative to the labium edge are critical. Try to deliver a smooth flowing sheet of air to that edge, which needs to be at the very bottom of the flow. and with the typical air speeds, the wind way height needs to be somewhere around 1.5 mm.
The curved wind way is credited with helping condensation escape out the corners without bothering the air flow as much as it can on a flat wind way.
So if the wind way bottom needs to align with the labium edge, and you need 1.5 mm for the wind way, the body material will need to be thick enough to contain both the wind way and the roof above the fipple without sticking up. Then you can either cut the wind way into the roof or turn down the OD of the body at the mouthpiece section to your wind way height and then slip a mouthpiece over it that is the same OD as your whistle body. This seems to be how Glenn's Water Weasel's are made. But with thin wall material you have to have 1.5 mm for the wind way and then something on top to contain it. You can see how a thin brass mouthpiece would allow this to be done more easily than using PVC.
My advice is to take the simple path to making a playable instrument (a la Guido's designs) and once you know what dimensions you must respect, then figure out how to achieve the appearance you like.
Have fun! I'm sure you will.
Carey
When there's a huge spill of solar energy, it's just called a nice day.
http://www.parkswhistles.com
http://www.parkswhistles.com
-
West
- Posts: 165
- Joined: Tue Aug 12, 2008 1:35 pm
- Please enter the next number in sequence: 1
- Location: Sweden
Ah! Flat windway floor + curved blade = bad idea. Okay, I'm glad I asked otherwise I may have spent a lot of time on a design that was doomed from the outset. I was just curious if it would work. I think I see the concept behind Guido's whistles much clearer now. Thanks for clearing that up.
But still, how come Clarke originals sound as good as they do, considering they have a flat windway (with an arched roof) and a blade that is neither straight nor curved but... well, dented is the best description I can think of. It doesn't look like a particularly exact design, yet it works quite well.
But still, how come Clarke originals sound as good as they do, considering they have a flat windway (with an arched roof) and a blade that is neither straight nor curved but... well, dented is the best description I can think of. It doesn't look like a particularly exact design, yet it works quite well.
Trying is the first step towards failure -- Homer Simpson
-
jemtheflute
- Posts: 6969
- Joined: Tue May 23, 2006 6:47 am
- antispam: No
- Please enter the next number in sequence: 8
- Location: N.E. Wales, G.B.
- Contact:
Opinions!!! I detest the darn things precisely because they are so breathy/dirty sounding and relatively unresponsive due to wastage of wind (and therefore air-hungry). They can be tweaked by improving the shaping of the labium to get it flatter bar a small curve at the sides and by fiddling with the windway roof (I have a Shaw alto G made the same way that is just about playable for special use thus modified), but they're never what I like in a whistle, heresy though that be to many! "Quite well"?????West wrote:But still, how come Clarke originals sound as good as they do, considering they have a flat windway (with an arched roof) and a blade that is neither straight nor curved but... well, dented is the best description I can think of. It doesn't look like a particularly exact design, yet it works quite well.
I respect people's privilege to hold their beliefs, whatever those may be (within reason), but respect the beliefs themselves? You gotta be kidding!
My YouTube channel
My FB photo albums
Low Bb flute: 2 reels (audio)
Flute & Music Resources - helpsheet downloads
My YouTube channel
My FB photo albums
Low Bb flute: 2 reels (audio)
Flute & Music Resources - helpsheet downloads
-
West
- Posts: 165
- Joined: Tue Aug 12, 2008 1:35 pm
- Please enter the next number in sequence: 1
- Location: Sweden
jemtheflute wrote:Opinions!!! I detest the darn things precisely because they are so breathy/dirty sounding and relatively unresponsive due to wastage of wind (and therefore air-hungry). They can be tweaked by improving the shaping of the labium to get it flatter bar a small curve at the sides and by fiddling with the windway roof (I have a Shaw alto G made the same way that is just about playable for special use thus modified), but they're never what I like in a whistle, heresy though that be to many! "Quite well"?????
I'd say "just about"!
Personally I don't mind the breathiness in the clarkes and I think mine sounds good (but then, it *is* slightly tweaked). They do waste a lot of air though, there's no contending that.
Opinions aside, my point was merely: Clarkes do work, so an oddly shaped blade is obviously not a whistle-killer.
Trying is the first step towards failure -- Homer Simpson
-
Feadoggie

- Posts: 3940
- Joined: Mon Feb 14, 2005 11:06 pm
- antispam: No
- Location: Stout's Valley, PA, USA
West, you're making good progress. Lots of interesting ideas being put forth as well. When I saw your design I had the same reactions Jem and Carey had based on my experience. So I am with them on ways to improve your design. I can offer some suggestions on the simple two-piece head construction. Both have been mentioned above but here are the ways I have approached them.
Recorders are frequently two-piece designs - tube and plug. The windway is cut into the inside of the tube at the head. This is called broaching. Mack Hoover makes CPVC heads using this design. I rough cut the voicing window to undrsized dimensions. Then I place a small stick in the window as a stop which protects the tubing where the labium will be formed. I then file out the windway to roughly half the thickness of the tube. This can be tedious on a narrow bore tube. Then I file the labium, fit the plug and adjust as needed.
For a "Dixon" style I tried this with CPVC. I made a mandrel shaped to the dimensions to which I wanted head to conform. This is pretty simple really. Take a dowel sized to the inside diameter of your pipe, make a small flat on the top for about 1" placed where you expect the mandrel to exit the tube. File another flat beyond that which is lower than the first by the thickness of your pipe. Actually the difference in height should be your desired windway height. Set the mandrel aside. Make a rough, undersized cut of the window into your pipe. Then immerse the head end of the pipe into acetone to soften the CPVC. Once the CPVC is pliable, insert the mandrel into the head. Line up the window and press the CPVC into place over the mandrel. You are trying to get a nice windway height out of this so make sure the tube is sufficiently flattened at the window. Let it set-up to retain its shape. File your blade. Make your plug with a flat top to line up a hair under the edge of the blade. Adjust as needed. I don't like this process much but it does work with care. I've tried a heat gun too and enjoyed that even less. If you can find the same tubing Dixon and Jem use you can avoid the acetone bath. That tubing is softened by dipping it into sufficiently warmed water. It can distort or even shrink if the water gets too hot though. I've tweaked a couple of Dixons that way. Let us know how you are progressing
Feadoggie
I've proven who I am so many times, the magnetic strips worn thin.
It has been mentioned above to make a flat wind to a flat blade, and a curved wind way to a curved blade.West wrote:I was pondering how to go about making a one-piece whistle, i.e. no clip-on cap. Now, I have no experience with whistle making and the mechanics of wind instruments, so be gentle with me if I'm way off target here.
Here's a quick & ugly image, it's obviously not to scale or anything, but it should help illustrate my thinking.
Would this even work?
The whistle I made in my avatar has no clip on cap, and has a curved windway to a curved blade. Click on the link below for some other examples of both clip on cap, and an internal sleeve. This leaves no visible cut on the out side of the whistle. With a clip on cap the wind way is cut into the tube than covered with the external cap. The internal sleeve has the windway cut into it and fits around the plug then slides into the whistle.
One advantage to the internal sleeve is you see no cut on the outside.
The other way to make a whistle with no cut on the outside is to machine the windway into the plug. I find it best to use a lathe to make the external cap or the internal sleeve. But before I had a lathe I used a drill press to drill out the tube, and drill another tube to make the sleeve from. However, I have a slow speed wet grinder to grind flat wood drills to a new size, and it requires a good holding setup to drill into the end of a tube.
''Whistles of Wood'', cpvc and brass. viewtopic.php?f=1&t=69086
-
West
- Posts: 165
- Joined: Tue Aug 12, 2008 1:35 pm
- Please enter the next number in sequence: 1
- Location: Sweden
Okay, some updates! First of all: no, it didn't take me this long. I've been down with a cold for almost a week and only this afternoon did I feel up to giving the whistle making a go again.
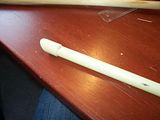
Body, fipple plug and fipple cap ready to be assembled. As you can see I ended up using the wood plug after all, I haven't had time to go hunting for other materials.
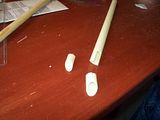
Before drilling the holes...
...and after.
Done, basically.
It ain't pretty but for a first try, it'll have to do.
Body, fipple plug and fipple cap ready to be assembled. As you can see I ended up using the wood plug after all, I haven't had time to go hunting for other materials.

Before drilling the holes...

...and after.

Done, basically.

It ain't pretty but for a first try, it'll have to do.
Trying is the first step towards failure -- Homer Simpson