Lotza buzz goin 'round about Spruce reeds lately. Can't find any Spruce videos or sound clips, so yesterday thought I'd try making one. Sounds kinda woody to me, but it's still brand new. It plays nice and easy, perhaps a little stiffer than cane, but this spruce is the softest I can find. Some here may be interested in how Spruce reeds actually sound, so here's a little demo...played on a Haneman boxwood B chanter.
https://www.youtube.com/watch?v=HaZyAh21xJo
Spruce Chanter Reed (demo)
Re: Spruce Chanter Reed (demo)
Well done lorenzo, on the reed and the video.
yes, it does sound a little woody for a boxwood B.
some more playing and perhaps a little more finishing might improve this.
Joseph Sampson posted some soundfiles of a Jim Carroll D chanter he was
selling a few years ago.
One with a cane reed he made himself and another with a spruce reed by
Michael O'Donovan as well as some pics of the reeds.
viewtopic.php?f=36&t=87676&view=next
From what I read I gather spruce reeds generally produce more fundamental and
less overtones, though I believe Benedict Koehler has produced reeds that
sound and play much like cane, but are more stable in changing humidity.
I also gather spruce blades need to be thinner than cane ones
to produce sparkly tone.
I made some spruce tongues once for some brass bodied composite drone reeds
they were quieter than both cane and styrene but had a pleasant warm tone,
less buzz. Did not get around to setting them up properly.
How was making a spruce chanter reed different from a cane reed?
I would be interested in reading your thoughts and experiences on this.
-
Lorenzo

- Posts: 5726
- Joined: Fri May 24, 2002 6:00 pm
- Please enter the next number in sequence: 1
- Location: Oregon, USA
Re: Spruce Chanter Reed (demo)
Thanks for the link, donpiper...and the suggestions as well. It probably all depends on the kind of spruce used...density and flexibility likely varies a lot...even within one sample. I tried Sitka first, and it seemed way too hard, but it could be I never scraped it thin enough (overall) even though the lips were too thin. Scraping more of a U than a V seems key to success.
There's probably more than one approach, but what worked for me was trimming the slip of spruce to the width desired for reed head, and to regular length, and cutting/sanding to about 1/8" thick. At this point it's a rectangular shape. Next, I gouged out a groove, for starters, and put it on the pipe to sand for final contour and thickness. Then, I roughly shaped the outer bark area by hand with Exacto knife along with some sanding, then finished shaping the outside by inserting a piece of sandpaper into a 1" (ID) plastic pipe and inserting the slip for final finish sanding/shaping. From then on it was pretty standard...gouge tone chamber, tie to staple, and final scrape until it vibrates.
There's probably more than one approach, but what worked for me was trimming the slip of spruce to the width desired for reed head, and to regular length, and cutting/sanding to about 1/8" thick. At this point it's a rectangular shape. Next, I gouged out a groove, for starters, and put it on the pipe to sand for final contour and thickness. Then, I roughly shaped the outer bark area by hand with Exacto knife along with some sanding, then finished shaping the outside by inserting a piece of sandpaper into a 1" (ID) plastic pipe and inserting the slip for final finish sanding/shaping. From then on it was pretty standard...gouge tone chamber, tie to staple, and final scrape until it vibrates.
-
Tunborough
- Posts: 1419
- Joined: Sun Dec 05, 2010 2:59 pm
- antispam: No
- Please enter the next number in sequence: 10
- Location: Southwestern Ontario
Re: Spruce Chanter Reed (demo)
The earlier thread has a great picture of the Michael O'Donovan spruce reed. I gather from the picture that the spruce is quarter-sawn, and has 8 year's growth across the reed. (Would that be about 10 lines per cm? More?)
Are you using quarter-sawn spruce, too, Lorenzo? How dense is the grain in your samples?
Are you using quarter-sawn spruce, too, Lorenzo? How dense is the grain in your samples?
-
Lorenzo
- Posts: 5726
- Joined: Fri May 24, 2002 6:00 pm
- Please enter the next number in sequence: 1
- Location: Oregon, USA
Re: Spruce Chanter Reed (demo)
Yes, quarter sawn. Mine's about the same as Michael's...8 growth rings within a 11mm wide reed head. The mountains around here are full of Englemann Spruce, so hope to find splinters from wind-blown trees this summer and figure out just what density and flexibility it takes to get a good sounding reed. This was my first. It could be Engelmann is too soft. Sitka is almost twice as hard on the Janke scale. Rule of thumb--Engelmann is whitish colored. Sitka, European, Adirondack, Red--all reddish in color (except sapwood).
Re: Spruce Chanter Reed (demo)
thanks lorenzo for the description and pics.
Did you use the same pipe as you would for cane? (to sand the inside curve)
From the video and pic it looks like you used a gentle bottle shape
for the blades.
Were there any issues when you tied the blades?
I am thinking harder material would present more difficulty tying.
(cracking, edges won't close etc.)
The spruce I have came from packaging for exercise machines that
a local gym imported from the US.
Some is suitable to use as reeds, some too coarse grained, some too knotty.
It is white that yellows as it ages, and is noticably softer & lighter than
Monterey pine (Pinus radiata) aromatic cedar and the Australian softwoods
I have. (celery top, hoop pine, huon pine, & king billy pine)
links to threads on related topics -
David Quinn - about K&Q C chanter w/ spruce reed:
https://listserv.heanet.ie/cgi-bin/wa?A ... S=&P=24004
Phil Sexton - describes the above reed:
https://listserv.heanet.ie/cgi-bin/wa?A ... =0&P=22272
thread on other forum about spruce chanter reeds:
http://uilleannforum.com/forums/viewtop ... f=4&t=1725
thread on other forum about cedar chanter reeds:
http://uilleannforum.com/forums/viewtopic.php?f=4&t=942
-
Lorenzo
- Posts: 5726
- Joined: Fri May 24, 2002 6:00 pm
- Please enter the next number in sequence: 1
- Location: Oregon, USA
Re: Spruce Chanter Reed (demo)
Thanks for the links, Don.
The size pipe I finally settled on was 2 3/8" dia. This was for a B chanter. Cane and spruce dimensions seem nearly the same.
Yes, the tails are carved into a bottle neck shape. Englemann spruce is softer than cane so you have to be very careful when sanding or you can get it too thin.
When inserting the staple, while the head is still tied, I use a wet sponge to dabble a little moisture on the edges of the "jaws" of the reed before tying. Using polyamide waxed string, it conforms really nice to the shape of the staple. This nylon string is so strong you can't break it. It's about 1mm wide and flat, not round. The seal is very tight since it's soaked in wax. No need to even double the wind, although I do go up from the tails and come back down...leaving the rolled copper staple exposed from there to the reed seat winding.
I emailed you a whole bunch of pictures of the process. It was much easier to email them than to load them all on Photobucket.
Re: Spruce Chanter Reed (demo)
Thanks for the reply, Larry.
got the pics, I'll have a good look later.
Found another link from 2000 where Benedict Koehler outlines his thoughts:
https://listserv.heanet.ie/cgi-bin/wa?A ... S=&P=26853
again Thanks!, this is really inspiring.
Cheers,
Donald
got the pics, I'll have a good look later.
Found another link from 2000 where Benedict Koehler outlines his thoughts:
https://listserv.heanet.ie/cgi-bin/wa?A ... S=&P=26853
again Thanks!, this is really inspiring.
Cheers,
Donald
-
Lorenzo
- Posts: 5726
- Joined: Fri May 24, 2002 6:00 pm
- Please enter the next number in sequence: 1
- Location: Oregon, USA
Re: Spruce Chanter Reed (demo)
Thanks Don for that last link. I found that very interesting! Thanks to Ben and David as well for the detailed information. From my experience, I agree with everything Ben said. The only thing he didn't mention was what type of spruce he'd been experimenting with. If, like someone has mentioned in the past, Ben came from a background of working with pianos (as do I) and the spruce from a piano soundboard was used to make his reeds, then he obviously was using Sitka. And that helps me a lot...along with his flexibility test.
The first and only other spruce reed I had tried making was from Sitka, and I thought it was too hard. But, I had no idea how thin it needed to be scraped. It was beautiful though, and when it just barely began to crow, the lips were so thin I stopped, and gave up, instead of scraping the V into a deep U. That's when I got a piece of Engelmann from my luthier who used it for bracing materials in his guitars.
So, the woody tone of this reed is probably due to the fact that Engelmann is too soft. Ben says not to use a piece too soft or too hard, but somewhere in the middle range. It might be possible that a harder piece of Engelmann would work better.
I have several other photos too...if you think I missed anything in the process.
And if anyone else wants a glimpse, message me your address and I'll email them to you. I've already sent a photo package out to a couple others.
Re: Spruce Chanter Reed (demo)
I don't know whether you have already done this, or how well it will work on spruce,
but I use this trick to improve tone on cane reeds:
Untie the head and separate the blades.
I put mark on the blades & staple with a sharpie
so I can put it back exactly as it was when re-tied.
Dip a finger in a glass of water and moisten
just the inside surface of the blades.
leave them about an hour to dry.
If you look closely when they have dried the
inside surface will appear furry.
Sand lightly with 800 - 1000 grit on a large cylinder
(about 100 - 130mm for flat pitch, 130 - 150mm for D reed)
just enough so 6 - 8mm from the lips on the inside surface
of the blades has a sheen.
Try not to thin the blades - just remove the furry stuff.
You can use a smaller cylinder to get further inside the
blade but the 6mm or so nearest the lips is the critical part.
If you have time and could be bothered you can do it a second time
but the difference will be less.
Re-tie the blades, put the reed back in the chanter and enjoy
the improvement in tone.
I also do this when I make a new reed, once before cutting the tails,
and again just before tying the head onto the staple.
(with cane, I sand my slips in one piece, cut the tails, cut it into 2 blades, finish the blades, tie, then scrape)
So my reeds have reasonable tone even if they won't play
much like a decent reed.
I notice you used blade length pieces rather than double length cut in half.
I suppose blade length pieces cut adjacent along the growth rings
(1 double thickness piece then split or cut along the grain)
would match more closely than a double length piece halved lengthwise
(the best way to match cane).
I might try one of each to see which works better or is easier.
-
Lorenzo
- Posts: 5726
- Joined: Fri May 24, 2002 6:00 pm
- Please enter the next number in sequence: 1
- Location: Oregon, USA
Re: Spruce Chanter Reed (demo)
My Spruce slips were longer...I cut them in half before gouging and sanding.
Great tip there on wetting and sanding again. I know at least one member here that does something similar...and he's had great success. One in particular plays like no other in my Hunter B chanter--almost easier in the upper octave than the lower.
But, why wait until the blades are tied? Why not wet and sand before tying (the first time)?
Re: Spruce Chanter Reed (demo)
Yes, I have been doing this on the last few reeds I have made,
with a noticeable improvement in tone, even at the crow stage.
I do it as the last step in the sanding process, before cutting the tails,
and again to 'clean up' before tying the blades to the staple.
about the thread (for tying blades), I have been using similar looking stuff,
but paler coloured on the last few reeds I made, and I like it.
David Goldsworthy uses even thicker round thread (about 1.3 - 1.5mm)
that is even easier to use, but being white and picking up dirt easily,
doesn't look as neat. I think it is sold as cable-lacing twine.
cheers,
Donald
-
geoff wooff
- Posts: 633
- Joined: Sat Apr 20, 2013 3:12 am
- antispam: No
- Please enter the next number in sequence: 8
- Location: centre France
Re: Spruce Chanter Reed (demo)
Lorenzo,
unless you have soldered your rolled staple's seams I recommend that the wrapping is continued down to cover it. This because the absolute air tightness of the reed is of paramount importance for the tone of the notes.
Similarly with Don's idea of wetting the fibres and re-sanding to get as smooth a surface as possible where the lips come together during play... the fine finish will help the blades to form a better airtight seal when they come together... this so that the moment of sealing is as short as possible with the least amount of ' oh, nearly sealed... yes just a bit more... ah now we are tight'...... this exact seal gives the vibrations a very clear,definate start and finish... the resultant sound will be crisper.... BUT you don't need to go to all the trouble of un-binding the heads and re-sanding... No:
If you imagine the grain of the wood having soft and hard layers and the surface under a microscope might resemble something corrugated... like Iron sheeting for roofs... then take your reed and press the two blade faces into each other to 'bed in' the joint. I use a sheet of Plate glass for this ( nice and smooth, flat and clean)... putting the reed head onto the glass and pressing the blade tips , hard, with my finger whilst I rub them back and forth, side to side, or around and around... a ten second burst of massaging should suffice and note the difference by suck testing the reed.
The begining of each vibration period should start with a clear crisp snap as the blades touch... if a reed sound commences " mee-errr" then try this before disassembling.
-
Lorenzo
- Posts: 5726
- Joined: Fri May 24, 2002 6:00 pm
- Please enter the next number in sequence: 1
- Location: Oregon, USA
Re: Spruce Chanter Reed (demo)
Thanks Geoff! That's a very helpful discription. I shall try the trick with the plate glass...and massaging the blades.
An oboe reed maker gave me a tiny tool that slips between the lips. After playing, and after the reed dries, he inserted it, squeezed the lips shut tight over it, then moved it in and out to smooth the inner surface of the lips. It's a ultra thin piece of metal, arrow shaped, brass or bronze I think. He also used the tool to insert between the lips, to strengthen the tip, while he scraped near the lips. Maybe you've seen one or know what it's called? I'll find it and take a picture.
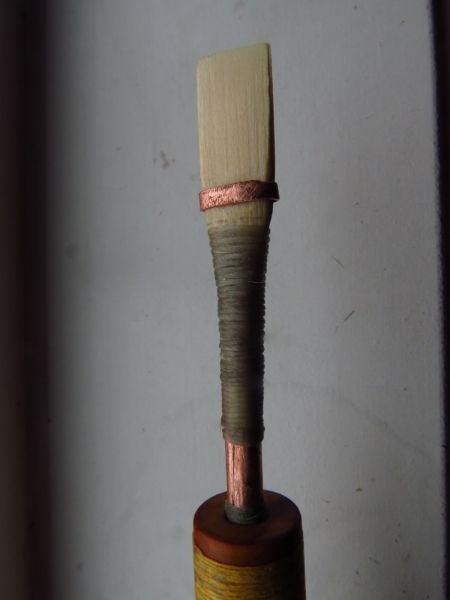
I use to solder the joint, but misplaced my soldering tools during a recent move, so I tried squeezing the seam tight with these arrow shaft pliers, then running several beads of super glue over the seam (let dry and repeat). Seems to work, and the winding on each side of the exposed copper helps keep things in place. There's no leaks...I always test the entire reed for air that may be escaping.
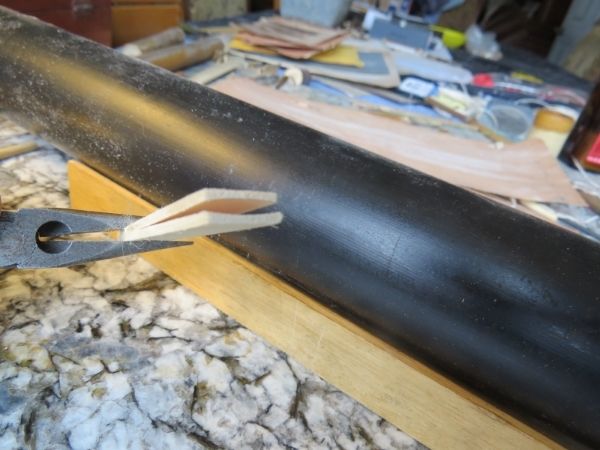
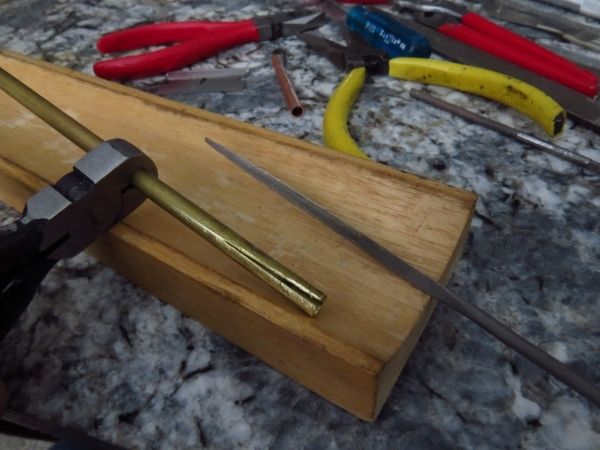
In this pic, I've opened a brass tube with a triangular file and am getting ready to squeeze the gap back together with these unique pliers, then seal with super glue...although most of the slit will be inside the tails or covered with winding.
I may have misread donpiper's suggestion of tying and untying the reed. He may have been talking about my spruce reed...to untie it, wet and sand, then retie it. I may do just that. I had to tie and untie the blades several times before I was satisfied with the performance of the reed. But, this woody tone I'm getting may brighten some with don's method...and yours too. I shall try and see what happens.
An oboe reed maker gave me a tiny tool that slips between the lips. After playing, and after the reed dries, he inserted it, squeezed the lips shut tight over it, then moved it in and out to smooth the inner surface of the lips. It's a ultra thin piece of metal, arrow shaped, brass or bronze I think. He also used the tool to insert between the lips, to strengthen the tip, while he scraped near the lips. Maybe you've seen one or know what it's called? I'll find it and take a picture.
I use to solder the joint, but misplaced my soldering tools during a recent move, so I tried squeezing the seam tight with these arrow shaft pliers, then running several beads of super glue over the seam (let dry and repeat). Seems to work, and the winding on each side of the exposed copper helps keep things in place. There's no leaks...I always test the entire reed for air that may be escaping.
In this pic, I've opened a brass tube with a triangular file and am getting ready to squeeze the gap back together with these unique pliers, then seal with super glue...although most of the slit will be inside the tails or covered with winding.
I may have misread donpiper's suggestion of tying and untying the reed. He may have been talking about my spruce reed...to untie it, wet and sand, then retie it. I may do just that. I had to tie and untie the blades several times before I was satisfied with the performance of the reed. But, this woody tone I'm getting may brighten some with don's method...and yours too. I shall try and see what happens.
-
an seanduine

- Posts: 1997
- Joined: Sun Sep 13, 2009 10:06 pm
- antispam: No
- Location: just outside Xanadu
Re: Spruce Chanter Reed (demo)
Not everything you can count, counts. And not everything that counts, can be counted
The Expert's Mind has few possibilities.
The Beginner's mind has endless possibilities.
Shunryu Suzuki, Roshi
The Expert's Mind has few possibilities.
The Beginner's mind has endless possibilities.
Shunryu Suzuki, Roshi