Only if you're actually torturing a cat.Doug_Tipple wrote:Do you mean that the scratchy tortured-cat tone is not supposed to be there?Darwin wrote:The closer it is to the bridge, the more high overtones get cut out. It's a bit like the Dobroish sound you get with a mute on the banjo, but not unpleasant. In fact, I used mine mainly not to make my fiddle quieter, but to reduce my scratchy tortured-cat tone.greenspiderweb wrote:Mike mentioned the sliding Roth mute, that can mute at different degrees. Does it still produce a nice tone if it is used a certain way?
damper for violins?
-
Darwin

- Posts: 2719
- Joined: Sat Jan 03, 2004 2:38 am
- Please enter the next number in sequence: 1
- Location: Flower Mound, TX
- Contact:
Mike Wright
"When an idea is wanting, a word can always be found to take its place."
--Goethe
"When an idea is wanting, a word can always be found to take its place."
--Goethe
-
Lorenzo

- Posts: 5726
- Joined: Fri May 24, 2002 6:00 pm
- Please enter the next number in sequence: 1
- Location: Oregon, USA
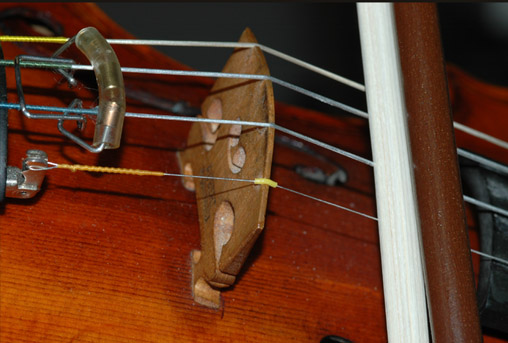
Violin bridge designs are extremely interesting. Lots of experiments have been done over the centuries. The amount of wood left on a bridge has a lot to do with the volume. The wings extending out from the kidneys are actually mutes...absorbing volume and certain tones. So are the little wings off the ankles. A clothes pin is just an extension of these wings vibrating out in mid air. The hole in the middle of the bridge is cut out to direct the valuable vibrations more directly to the feet and onto the bass bar and sound post.

Where it says "TRIM HERE" -this curve has to match the curve on the top of the violin. Sad to say, you can't just buy a new bridge and put it on. Everything has to be custom cut to match the violin. You've probably noticed that some violins are set up with tall bridges, others with short bridges. The arch of the string over the bridge can vary. The pressure of the string on the violin top is also important. Some violins can take more pressure than others. The strings should rest half in and half out of the bridge, and leave the very edge of the bridge solidly--the side facing the fingerboard. The back of the bridge should be 90 deg. to the top. The little feet of the bridge can only be a certain thickness...not the thickness that comes with a new blank.
Everything is just so damn complicated and critical! But y'gotta love it.
-
greenspiderweb

- Posts: 1974
- Joined: Sat Jan 24, 2004 5:23 pm
- antispam: No
- Please enter the next number in sequence: 10
- Location: SE PA near Philly
-
Doug_Tipple

- Posts: 3829
- Joined: Wed Mar 31, 2004 8:49 pm
- antispam: No
- Please enter the next number in sequence: 10
- Location: Indianapolis, Indiana
- Contact:
Yes, I agree with Lorenzo, there is a lot of work involved in shaping a new violin bridge from a bridge blank. Most experienced luthiers would use a belt sander and a sharp knife to shape the bridge. However, a quality bridge is made from hard maple, and it doesn't cut very easily. You have to have a very sharp knife and be careful that you don't cut yourself in the process. I think that some of the best luthiers can shape the feet of a bridge with nothing more than a knife. I preferred to use a specially made tool that held the bridge firmly at a 90 degree angle to the top. Once I had the bridge feet about the right thickness, I would take a pencil and mark all of the bottom side of the feet with a lead pencil mark. With a small piece of sandpaper on the top of the violin in the position of the bridge, I would move the tool with bridge back and forth across the sandpaper until all of the pencil marks have been removed from the bottom of the feet. At that point the feet were fitted to the top.
Then you need to have the bridge at a proper thickness at the feet and at the top of the bridge. The arc of the top of the bridge is also important. There is a difference between a bridge arc designed for classical playing and a bridge arc for fiddlers. Many fiddlers want a flater arc so that they don't have to move the bow so much to go from string to string.
With regard to bridge height, I generally would initially make the bridge a little higher than I wanted. Then, measuring the distance between each string and the finger board, I would do the final shaping of the top of the bridge for correct height, arc, and thickness.
-
greenspiderweb
- Posts: 1974
- Joined: Sat Jan 24, 2004 5:23 pm
- antispam: No
- Please enter the next number in sequence: 10
- Location: SE PA near Philly
-
Doug_Tipple
- Posts: 3829
- Joined: Wed Mar 31, 2004 8:49 pm
- antispam: No
- Please enter the next number in sequence: 10
- Location: Indianapolis, Indiana
- Contact:
Most of the bridge blanks that I have seen are flat on the bottom between the feet. With a sharp knife I make this a gently curve, although I haven't tried to match the curve to the curve of the violin top. But, then again, I didn't attend a violin making school. I managed to learn little by little mostly through trial and error.greenspiderweb wrote:I'm with you on all that you said there, Doug, that's basically the way I've done it in the past too. But, arching the underside of the bridge (where the diagram says "trim here" is new to me. Have you seen that before, Doug?
In general, I think that it is a good idea to have a violin bridge as thin as possible without sacrificing its strength too much in the process. Reducing wood from the wing holes also helps to reduce the mass, making the bridge more responsive to fine vibrations from the strings. The set of the neck on the violin pretty much determines how high the bridge needs to be for the proper string height from the fingerboard. I think that the loudest violins are ones that support a taller bridge. With regard to the photo of the violin bridge submitted by Lorenzo, if I was doing that bridge, I would have the bridge thinner at the top. It looks a little clunky to me, but, like I implied before, there are many ways of doing things.
-
Lorenzo
- Posts: 5726
- Joined: Fri May 24, 2002 6:00 pm
- Please enter the next number in sequence: 1
- Location: Oregon, USA
I use to work for a violin maker and learned a lot by talking to some of the best violin shops here in the NW David Kerr, Portland, and a couple others in Seattle.greenspiderweb wrote:Thanks, Lorenzo...Did you get this info from a particular website?
Re the thickness of the bridge at the top of the arch that Doug was talking about, it's suppose to vary according to the thickness of the strings...G string=thicker wood, etc. BTW, that sleeve on the E string hanging over the bridge is a no-no too! The string should be free to vibrate from the very edge of the bridge. The most important thickness-to-tone is the overall thickness of the bridge. Many people get the entire bridge too thin, esp at the feet (plus feet too thin flatwise), and wonder why the violin sounds hollow. The soundpost thickness is also critical to the tone...as is the way the ends of the post fit the back and top. The post has to be custom fit to a certain distance from the right foot of the bridge too or else it will sound too bright or too dark. If the post is too large around or too small, a pro will just hand your violin back to you and say it needs to be set up right before he can comment on the tone.
My first job at the violin shop was regraduating violin tops and making new bass bars. But, some of the most expensive violins I've ever seen were not made perfect by any means (and we wouldn't dare mess with them). They had the handmade feel to them. For example, the concert master of the symphony had an old handmade Italian violin. If you set the violin on edge, it would rock sideways back and forth because the top and back were not glued to the ribs as if bound perfectly in a jig. The scroll and F holes were not perfect either, but artistically beautiful...as only handmade can be.
Some wood is just dead--either/or both tops and backs. That's why you hear so much about the "tapping" test for tone during the scraping process. There's something like 20-25 things on a violin that all have to be perfect to get the perfect tone. One weak link...and the whole violin sounds all the worse.
-
Jay-eye

- Posts: 408
- Joined: Mon Jan 14, 2002 6:00 pm
- antispam: No
- Please enter the next number in sequence: 8
- Location: Birmingham, UK
Getting back to the mute....
I use one of the solid metal (chromed) quite heavy mutes an on my fiddle. It gets a bit of rosin sticking to it so you have to wash it every now and again. See, our house is a bit open plan and when the little woman's watching tv or asleep there's only ever one door between me and her, and that one not always shut. I can play ANY TIME, day or night, with the mute on and not bother her. I don't wake her up and I don't spoil her tv watching! (That's why I gave up the uilleann pipes, folks!)
So that's what I use, however, I believe they now do the same in rubber - that might be better and safer to use round a pristine polished top of a treasured violin! My fiddle carries a few scars so a fumbled metal mute isn't the end of the world. (Plus I don't have a thing about rubber )
)

I use one of the solid metal (chromed) quite heavy mutes an on my fiddle. It gets a bit of rosin sticking to it so you have to wash it every now and again. See, our house is a bit open plan and when the little woman's watching tv or asleep there's only ever one door between me and her, and that one not always shut. I can play ANY TIME, day or night, with the mute on and not bother her. I don't wake her up and I don't spoil her tv watching! (That's why I gave up the uilleann pipes, folks!)
So that's what I use, however, I believe they now do the same in rubber - that might be better and safer to use round a pristine polished top of a treasured violin! My fiddle carries a few scars so a fumbled metal mute isn't the end of the world. (Plus I don't have a thing about rubber
Tóg go bog é, dude.....
j.i.
j.i.