3d printed whistles, take 2?

The Ultimate On-Line Whistle Community. If you find one more ultimater, let us know.
User avatar
Wanderer
Posts: 4452
Joined: Wed Mar 24, 2004 10:49 pm
antispam: No
Please enter the next number in sequence: 8
Location: Lovettsville, VA
Contact:

3d printed whistles, take 2?

Post by Wanderer »

It seems like I get back to this thought every half-decade or so ;)

viewtopic.php?f=1&t=108753

In 2019, I ran an experiment where I tried to have a 3d printed whistle made. But I ran into a lot of issues.

At the time, I wasn't very good at CAD software, so I sent all of my calculations and measurements to a guy from India that I met on Fiverr, and he produced very serviceable 3d print files for me. But I never got good at modifying them, so I had to keep contacting him for changes, and those costs added up.

Secondly, I was sending those files to Shapeways to print on an SLS style printer, which was supposed to have really fine dimensional accuracy. But I never could get super satisfactory results from them without doing a lot of work on the whistles. And even then, those whistles had problems with voicing and tuning across the octaves. The price of having these things prototyped was a bit excessive...for heads, it could run me somewhere around $9.00 (if memory serves) per whistle head for the 'low quality' prints, and over $20 for the high-quality ones. After spending a few hundred dollars playing with the idea, I gave up on it--the cost was too high, and I felt like I wasn't making sufficient progress, even after running through probably close to 50 prototypes. And it was taking too long--days to get modifications from the one guy (though the price was very reasonable) and a couple of weeks and lots of money to get batches of them printed from Shapeways.

Fast forward to 2023--a friend of mine had a 3d printer in the box, and was nervous about setting it up because it was an entry-level model you have to build yourself. None of her friends who offered to help followed through, so when I moved back to Texas, she asked me. I set it up for her and played with it for a week while I was waiting for her to come get it, and fell in love with 3d printing. So, I got my own printer--a little higher end model.

Which led to another friend reminding me that I'd once tried to 3d print whistles. "Well, why not give it another shot?" I thought. In the interim, I've gotten a lot more familiar with CAD software, and set about dusting off all of my old measurements and observations and rebuilding shape files from scratch. That was about 6 weeks ago.

Being able to make my own changes to the files in minutes and seeing near-immediate (half an hour or so for a whistle head) results was really encouraging and kept the momentum rolling, and I've seen steady improvements in the resulting whistles and the process.

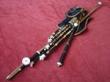
This is my latest effort:
https://www.youtube.com/watch?v=8DQtf9EU-n0
│& ¼║: ♪♪♫♪ ♫♪♫♪ :║
User avatar
Terry McGee
Posts: 3335
Joined: Sun Dec 12, 2004 4:12 pm
Please enter the next number in sequence: 1
Location: Malua Bay, on the NSW Nature Coast
Contact:

Re: 3d printed whistles, take 2?

Post by Terry McGee »

Wow, that's really exciting, Wanderer. I've long felt that the future of our flute and whistle developments will probably lie in the combination of 3D Printing (or some yet-to-be-developed prototyping technology) and Computer Modelling. You seem to have cracked the first of those! Tunborough, you're on notice!

What bits are 3D Printed in your example? The head and body presumably. Ferrules (rings)? Tuning slide? (Surely not!)

And is the head "one blob" of 3D printed material in the way of the old plastic moulded heads, or made up of sections, eg the head body, the stopper and the cover that we have become familiar with post Sindt?
User avatar
Terry McGee
Posts: 3335
Joined: Sun Dec 12, 2004 4:12 pm
Please enter the next number in sequence: 1
Location: Malua Bay, on the NSW Nature Coast
Contact:

Re: 3d printed whistles, take 2?

Post by Terry McGee »

Hmmm, I had more, but the dreaded Internal Server Error has resurfaced. So here's the leftovers...

I was interested to see the curved edge on the bottom of the ramp. I would have thought that not a good idea - that we would want the transit time across the window to be uniform across the window. But am I ignoring something or blowing it out of appropriate proportion?

Anyway, well done! And now the big question. What comes next?
User avatar
BigDavy
Posts: 4882
Joined: Sat Dec 11, 2004 5:50 am
Please enter the next number in sequence: 1
Location: Larkhall Scotland

Re: 3d printed whistles, take 2?

Post by BigDavy »

Wanderer, these might be of interest to you.Qwistle 3d printer plans
Payday, Piping, Percussion and Poetry- the 4 best Ps
User avatar
Wanderer
Posts: 4452
Joined: Wed Mar 24, 2004 10:49 pm
antispam: No
Please enter the next number in sequence: 8
Location: Lovettsville, VA
Contact:

Re: 3d printed whistles, take 2?

Post by Wanderer »

(server error wouldn't let me use quotes..blah)

The entire whistle is 3d printed.
The ferrules and tuning slide are printed with a silver-colored plastic. The rest of the whistle whistle is a plastic that is gradient colored on the filament roll (much like gradient yarns for knitting/crochet). The machine I have will let me change those plastics out during the print, so I set it all up, hit "go" and come back and pull a whistle off the print bed. Though I do print the bodies and the heads as two separate parts.

This means the ferrules are decorative only and don't provide any actual strengthening function. But I find I quite like them--and they make it easy to find the right end to stick your whistle head into. I have one whistle printed without them, and I'm always having to double check which end goes where when I'm assembling the thing.

The tuning slides are quite robust, but 3d printing is weakest with shear forces along layers--so you could snap that slide if you tried. But so far, they've held up just fine in normal use.

So everything on each part is one "blob". the heads (including ferrule and tuning slide) are one part, and the bodies (including ferrules and slight bit of mortise to accommodate the tuning slide) are a second part.

This is basically what the print setup looks like in the "slicing" software (the bit that turns a 3d file into instructions for the printer)
https://i.imgur.com/8xaTJf7.png

I've seen a number of other whistles with curved ramps that worked, and I found that geometry easier to work with than attempting to create a straight-bladed ramp with my limited CAD software knowledge (though I know it can be done!)--so that's what I tried first. Basically, if you imagine taking a tube, and slicing through it at an angle to make a ramp, the curved bit happens naturally, and would take some effort to straighten out.

Since I've seen it work on other whistles, and thinking back to the original Clarke whistle and how low-tech that ramp is, I just gave it a shot. And since it worked, I am not spending a lot of time tinkering with that bit! Though I did make several prototypes changing the angle of that cut until I found one I liked best. That's the thing I like about CAD and 3d printing. if I want to change an angle a half-degree, it's easy--my ability to do such things manually with a file is just not up to snuff.

As for what's next? I'm not sure. I'm having a lot of fun improving the process. I'm selling 3d printed stuff at pop-up markets here and town and sold a couple whistles at those. Someone on Facebook expressed an interest, and he has one. But I'm not *really* gearing up to sell these things with a website and all that jazz just yet. Though I imagine that's coming.
Last edited by Wanderer on Wed Dec 27, 2023 10:40 pm, edited 3 times in total.
│& ¼║: ♪♪♫♪ ♫♪♫♪ :║
User avatar
Wanderer
Posts: 4452
Joined: Wed Mar 24, 2004 10:49 pm
antispam: No
Please enter the next number in sequence: 8
Location: Lovettsville, VA
Contact:

Re: 3d printed whistles, take 2?

Post by Wanderer »

BigDavy wrote: Wed Dec 27, 2023 8:29 pm Wanderer, these might be of interest to you.Qwistle 3d printer plans
I've seen those...but I haven't wanted to look at them too closely. I wanted all my ideas to be my own designs from the ground up.
│& ¼║: ♪♪♫♪ ♫♪♫♪ :║
User avatar
Terry McGee
Posts: 3335
Joined: Sun Dec 12, 2004 4:12 pm
Please enter the next number in sequence: 1
Location: Malua Bay, on the NSW Nature Coast
Contact:

Re: 3d printed whistles, take 2?

Post by Terry McGee »

Great stuff Wanderer. Keep us in touch with progress.

I've made a few whistles "the hard way", and mill the ramp, using an approximation approach, rotating the head in 5 degree increments. So rather than a perfectly curved ramp yielding a perfectly straight edge (when viewed from above), I end up with a dozen or so facets to the curve and therefore to the edge. Easily touched up if wanted, but it doesn't seem to be critical. I notice Killarney whistles do the same in brass. That could be an approach if the 3D curve maths gets too scary, and if you determine it would be better to have a uniform window "length". But these are matters probably to be determined experimentally.
User avatar
Wanderer
Posts: 4452
Joined: Wed Mar 24, 2004 10:49 pm
antispam: No
Please enter the next number in sequence: 8
Location: Lovettsville, VA
Contact:

Re: 3d printed whistles, take 2?

Post by Wanderer »

Terry McGee wrote: Thu Dec 28, 2023 1:24 am Great stuff Wanderer. Keep us in touch with progress.

I've made a few whistles "the hard way", and mill the ramp, using an approximation approach, rotating the head in 5 degree increments. So rather than a perfectly curved ramp yielding a perfectly straight edge (when viewed from above), I end up with a dozen or so facets to the curve and therefore to the edge. Easily touched up if wanted, but it doesn't seem to be critical. I notice Killarney whistles do the same in brass. That could be an approach if the 3D curve maths gets too scary, and if you determine it would be better to have a uniform window "length". But these are matters probably to be determined experimentally.
I've made a few wooden whistles back in the day, using a set of jeweler's files. Which made it 'easy' to get that straight-across blade. And when I first tried 3d printing whistles 5 years ago, I also voiced them with those same jeweler's files, and one of the first things I did was straighten the blade out. My designs at the time accounted for that reshaping and subsequent material loss in the windway sizing.

With this latest set of attempts, I asked myself if all that was necessary. After all, I've seen other working whistles with a half-moon blade (Impepe, Alba, and Kerry Songbird come to mind), and the same blade geometry works for quenas, the pinkillu, xiao, shakuhachi, among others. So I just figured I'd try it as-is. And since it seems to be working well, I'm just not inclined to futz with it further.
│& ¼║: ♪♪♫♪ ♫♪♫♪ :║
Tunborough
Posts: 1419
Joined: Sun Dec 05, 2010 2:59 pm
antispam: No
Please enter the next number in sequence: 10
Location: Southwestern Ontario

Re: 3d printed whistles, take 2?

Post by Tunborough »

Terry McGee wrote: Wed Dec 27, 2023 6:56 pm I was interested to see the curved edge on the bottom of the ramp. I would have thought that not a good idea - that we would want the transit time across the window to be uniform across the window. But am I ignoring something or blowing it out of appropriate proportion?
In my limited experience with curved leading edges (as seen from above), I didn't care for the tone.

If the ramp is flat and the tube is curved, cutting the leading edge straight across will leave the sides of the leading edge flat rather than sharp. I haven't found this to be a detriment.
User avatar
David Cooper
Posts: 149
Joined: Thu Mar 10, 2022 5:24 pm
antispam: No
Please enter the next number in sequence: 8
Tell us something.: I'm about to have a go at making wooden flutes based on a quena - I want to experiment with changing the hole sizes and locations to make one that's more comfortable to play. I just received an auger through the post today, and there are blown-down trees in the garden waiting to be repurposed, so I'll try to make a start on my first prototype at the weekend.

Re: 3d printed whistles, take 2?

Post by David Cooper »

Terry McGee wrote: Wed Dec 27, 2023 6:56 pmI was interested to see the curved edge on the bottom of the ramp. I would have thought that not a good idea - that we would want the transit time across the window to be uniform across the window. But am I ignoring something or blowing it out of appropriate proportion?
When I experimented with making a fipple adapter for my quenas I was thinking I should maybe try making some with a straight edge to the ramp, but it worked fine without bothering, and I also know that such quenas have a reputation for being a little harder to play, perhaps because a straight edge is sub-optimal. Think about the air speed at the sides where it's slowed by friction - it will take longer to get there than the air in the middle. The best shape I've found is not the one you get by using a round file for each "bisel" (the internal and external sides of the ramp) as you get too pointy an "escotadura" (the shape of the window hole), so I go for something more of a U shape and do the final stages by carving with a knife to make it less V shaped. It wouldn't surprise me if the best shape for blowing directly onto it is the same as is needed for air coming to it from a windway.
User avatar
Wanderer
Posts: 4452
Joined: Wed Mar 24, 2004 10:49 pm
antispam: No
Please enter the next number in sequence: 8
Location: Lovettsville, VA
Contact:

Re: 3d printed whistles, take 2?

Post by Wanderer »

Terry McGee wrote: Thu Dec 28, 2023 1:24 am Great stuff Wanderer. Keep us in touch with progress.

I've made a few whistles "the hard way", and mill the ramp, using an approximation approach, rotating the head in 5 degree increments. So rather than a perfectly curved ramp yielding a perfectly straight edge (when viewed from above), I end up with a dozen or so facets to the curve and therefore to the edge. Easily touched up if wanted, but it doesn't seem to be critical. I notice Killarney whistles do the same in brass. That could be an approach if the 3D curve maths gets too scary, and if you determine it would be better to have a uniform window "length". But these are matters probably to be determined experimentally.
So, the tuning slide is the weakest part of these whistles. They hold up, for the most part, but if you bend them just a little too hard (such as trying to shove them in a boot for the 10th time) it can break. Because of the way 3d printing works, the shear strength across layer lines is the weakest, and the tuning slide is a half-millimeter thin...so it's the weak point.

I don't like that much, so I've ordered some brass tubing in the appropriate size. When it gets here, I'm going to experiment with replacing that 3d printed tube with a metal one, for greater longevity. But until then...another tune!

https://www.youtube.com/watch?v=fSYXdXvHQfE
│& ¼║: ♪♪♫♪ ♫♪♫♪ :║
User avatar
BigDavy
Posts: 4882
Joined: Sat Dec 11, 2004 5:50 am
Please enter the next number in sequence: 1
Location: Larkhall Scotland

Re: 3d printed whistles, take 2?

Post by BigDavy »

Wanderer, a friend of mine who is into experimenting with uilleann pipes using 3D printing had the same problem. He found that printing the parts by adjusting the print so that the layer lines were diagonal to the vertical axis of the part gave much more strength to the part in use.
Payday, Piping, Percussion and Poetry- the 4 best Ps
User avatar
Wanderer
Posts: 4452
Joined: Wed Mar 24, 2004 10:49 pm
antispam: No
Please enter the next number in sequence: 8
Location: Lovettsville, VA
Contact:

Re: 3d printed whistles, take 2?

Post by Wanderer »

BigDavy wrote: Thu Jan 04, 2024 5:36 am Wanderer, a friend of mine who is into experimenting with uilleann pipes using 3D printing had the same problem. He found that printing the parts by adjusting the print so that the layer lines were diagonal to the vertical axis of the part gave much more strength to the part in use.
Yup, I know the technique you refer to. But angling the print introduces other problems, notably with support placement.

One of the ways I'm getting around the limitations of my nozzle size is using the internal supports in the mouthpiece as double duty to also provide a 'wall' to lay the labium ramp on as it goes down. This allows me to print a thinner blade than would otherwise be possible by just printing the ramp in the air. In so doing, I get a play-ready ramp straight from the printer, rather than something I have to take files to in order to clean it up afterwards.

The tuning-slide are a high-use part, and even if it doesn't break, will eventually wear and loosen due to friction of sliding it around. I think for long-term longevity, I'm ok with adding a few cents and a few minutes to the process by putting in a brass piece there instead.
│& ¼║: ♪♪♫♪ ♫♪♫♪ :║
User avatar
Wanderer
Posts: 4452
Joined: Wed Mar 24, 2004 10:49 pm
antispam: No
Please enter the next number in sequence: 8
Location: Lovettsville, VA
Contact:

Re: 3d printed whistles, take 2?

Post by Wanderer »

Tubing arrived yesterday, and OD was right where the seller said it would be. My printers were busy, so I spent the afternoon modifying my CAD files to do away with the printed tuning slide, and instead created a spot for the brass one to go.

Image

Fit tests done today seem to be just right, so I'm currently printing a full whistle where I can slot the slide in and see how it goes.
│& ¼║: ♪♪♫♪ ♫♪♫♪ :║
User avatar
Wanderer
Posts: 4452
Joined: Wed Mar 24, 2004 10:49 pm
antispam: No
Please enter the next number in sequence: 8
Location: Lovettsville, VA
Contact:

Re: 3d printed whistles, take 2?

Post by Wanderer »

New whistle printed. Tuning slide works great!

Made a short video about it, in which I purposefully break one of the old style whistles. I hope it's obvious in the video that it's not *that* easy to break them, but I do believe the brass slide is a much better solution.

https://youtu.be/nRA2P8t_qQc
│& ¼║: ♪♪♫♪ ♫♪♫♪ :║
Post Reply